All rights reserved © 2026

Adding text to your videos in DaVinci Resolve transforms raw footage into polished content. Whether you’re creating YouTube videos, professional documentaries, or social media clips, text elements like titles, captions, and lower thirds are essential for engaging viewers. This guide walks you through everything from basic title creation to advanced animated text techniques using both the free version and DaVinci Resolve Studio.
DaVinci Resolve offers multiple ways to add text, each suited for different needs. The Edit page provides quick text tools for simple titles. The Fusion page unlocks advanced motion graphic capabilities. Understanding when to use each method saves time and delivers better results. Best of all, these powerful text effect features come free with DaVinci Resolve, making professional-quality visual effect work accessible to everyone.
The quickest way to add text is through the Edit page. Open your project and navigate to the Effects Library in the upper left corner. Under Toolbox, you’ll find the Titles category containing various text presets. Simply drag any basic title onto your timeline above your video clip. The default “Text+” tool is perfect for basic needs. Professional editors using the DaVinci Resolve Editor Keyboard can use dedicated keys for faster text element placement.
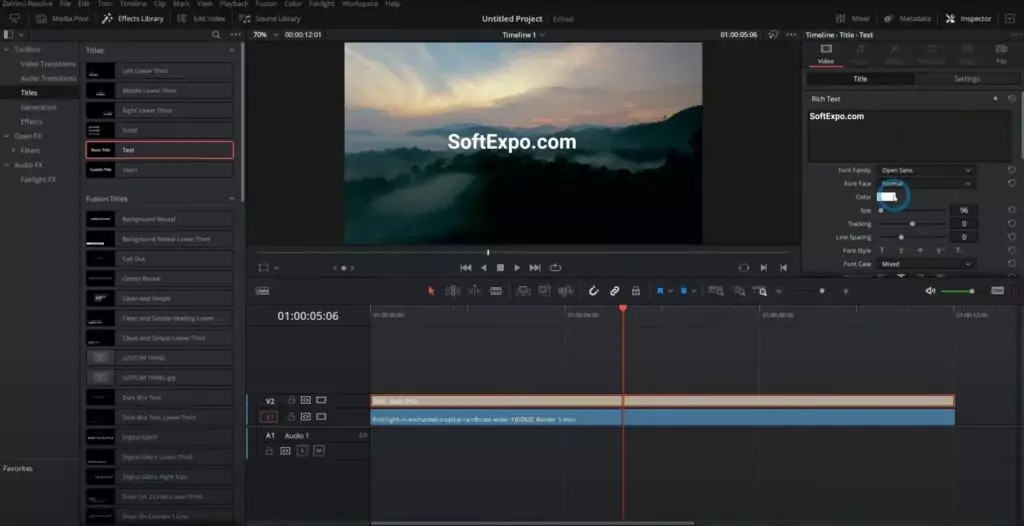
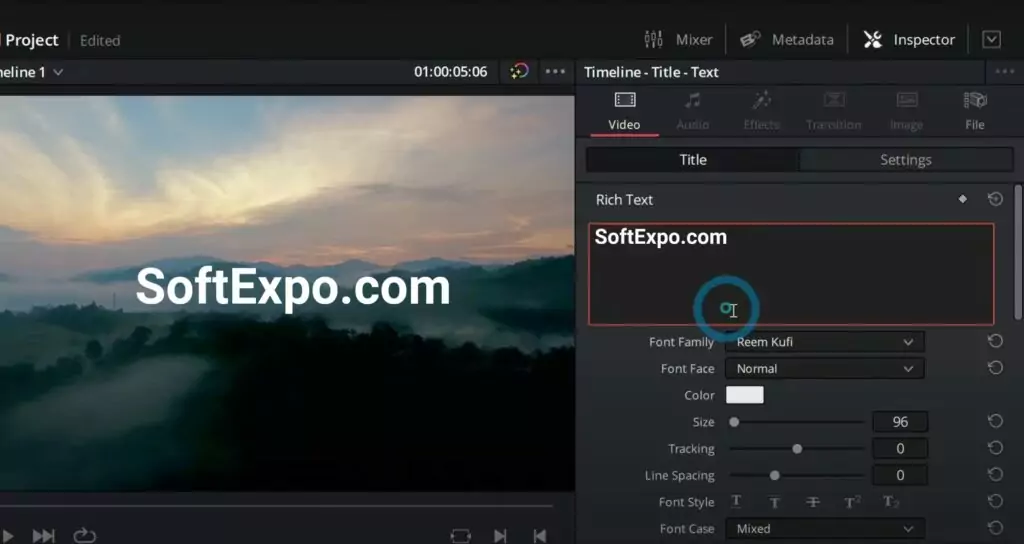
Double-clicking the text clip on your timeline opens the Inspector panel on the right. Here’s where the magic happens. Type your desired text in the content field. Adjust font, size, color, and alignment using the intuitive controls. The real-time preview shows changes instantly, making experimentation easy.
For more control, explore the text properties. The Font panel offers thousands of typeface options if you have them installed on your system. Size controls work with precise numeric input or slider adjustments. Color selection includes an eyedropper tool to match colors from your video. These basic adjustments cover most text needs.
Positioning text requires understanding DaVinci Resolve’s coordinate system. Click and drag directly on the preview window to move text. For precise placement, use the Position X and Y values in the Inspector. The anchor point determines the text’s center of rotation and scaling. Mastering these controls ensures pixel-perfect text placement every time.
The timeline placement matters too. Text clips behave like video clips — you can trim, extend, or move them. Placing text on higher video tracks creates overlays. Use the blade tool to split text clips for different timings. This flexibility lets you synchronize text with specific moments in your footage.
Static text is just the beginning. DaVinci Resolve’s keyframe animation brings titles to life. Select your text clip and open the Inspector. Notice the diamond-shaped keyframe buttons next to most parameters. These create animation points over time.
To animate text appearing on screen, position the playhead where text should start. Set the Opacity to 0 and click the keyframe button. Move the playhead forward and set Opacity to 100. DaVinci Resolve automatically creates smooth transitions between keyframes. This simple technique works for position, scale, rotation, and any other parameter.
The Fusion page unleashes professional motion graphic capabilities. Right-click your text clip and select “Open in Fusion Page.” Here, node-based compositing provides unlimited creative possibilities. The Text+ node connects to various effect nodes like Blur, Glow, or Shadow. Building node trees might seem complex initially, but the visual feedback makes learning intuitive. Creating a Fusion title with multiple animated elements becomes second nature with practice.
Fusion’s animated text presets save hours of work. The Templates section includes professionally designed animations. Follower modifier creates cascading letter animations. Write-on effects simulate handwriting or typewriter styles. These presets are customizable — adjust timing, direction, and style to match your vision. Blackmagic Design regularly updates these templates, ensuring fresh options for your projects.
Working with subtitles requires different techniques. To add subtitle functionality, first create a subtitle track by right-clicking in your timeline and selecting “Add Subtitle Track.” This dedicated track ensures proper formatting and export options. You can type subtitles directly or import SRT files. DaVinci Resolve Studio includes advanced features like automatic subtitle generation using the DaVinci Neural Engine, saving hours of manual transcription work.
Typography choices dramatically impact viewer experience. Sans-serif fonts like Arial or Helvetica work best for general video content. They remain readable even at smaller sizes or lower resolutions. Serif fonts suit formal or artistic projects but require larger sizes for clarity. Always preview text on different devices to ensure readability.
Color contrast determines text visibility. White text with black outlines works on any background — it’s the universal solution. For cleaner looks, sample background colors and choose complementary opposites. The stroke feature adds outlines without separate layers. Drop shadows create depth but use them sparingly to avoid dated looks.
Timing text with audio improves comprehension. Place text slightly before the corresponding audio for optimal viewer processing. Keep text on screen for roughly one second per three words. Shorter durations feel rushed while longer durations bore viewers. These guidelines adapt based on content complexity and target audience.
Hardware controllers enhance workflow efficiency dramatically. The DaVinci Resolve Advanced Panel provides dedicated controls for precise text positioning during live production. For audio-driven projects, the Complete Fairlight Studio Console allows synchronized text timing with sound design. Even the portable DaVinci Resolve Mini Panel speeds up color grading sessions when matching text colors to footage. These professional tools from Blackmagic Design transform editing from mouse-clicking to intuitive, tactile control.
Export settings affect text quality. DaVinci Resolve renders text at full resolution, but compression can introduce artifacts. For text-heavy videos, increase bitrate settings in the Deliver page. YouTube and other platforms recompress uploads, so export at higher quality than seems necessary. Sharp text distinguishes professional content from amateur videos.
Performance optimization keeps DaVinci Resolve responsive. Complex text animations and visual effects can slow preview playback. Use proxy mode or reduced resolution previews while editing. Render in Place creates temporary files for heavy Fusion compositions. These techniques maintain smooth editing even on modest hardware. For faster editing, consider the DaVinci Resolve Speed Editor or DaVinci Resolve Mini Panel for tactile control. The final render always uses full quality regardless of preview settings.
DaVinci Resolve provides professional text tools without professional prices. From simple titles to complex animations, the software handles any text requirement. Start with basic text on the Edit page. Explore animation through keyframes. Graduate to Fusion for advanced effects when ready.
Remember that effective text enhances rather than dominates your video. Keep designs clean and readable. Match text style to your content’s tone. Practice with different techniques to develop your unique style. Most importantly, focus on serving your story — fancy effects mean nothing if viewers can’t understand your message.
The skills you learn adding text in DaVinci Resolve transfer to other aspects of video editing. Keyframe animation principles apply to color correction and effects. Fusion node concepts unlock compositing possibilities. Text work often becomes the gateway to deeper software mastery. Start simple, experiment freely, and let your creativity guide the journey.