Description
Resizing an image is one of the most fundamental skills in Adobe Photoshop, whether you are preparing photos for a website, social media, or high-quality printing. Mastering this process ensures your images look crisp and professional without unnecessary file bloat or pixelation. Before you begin, simply open the image you wish to adjust in Photoshop.
What You'll Need
To follow this guide, you will need a Windows PC running Adobe Photoshop (version 2025 or 2026 recommended, though older versions like CC 2024 work similarly). No plugins are required, but having your target dimensions (in pixels or inches) ready will speed up the process. We assume you have basic familiarity with opening files in Photoshop.
Step-by-Step Guide
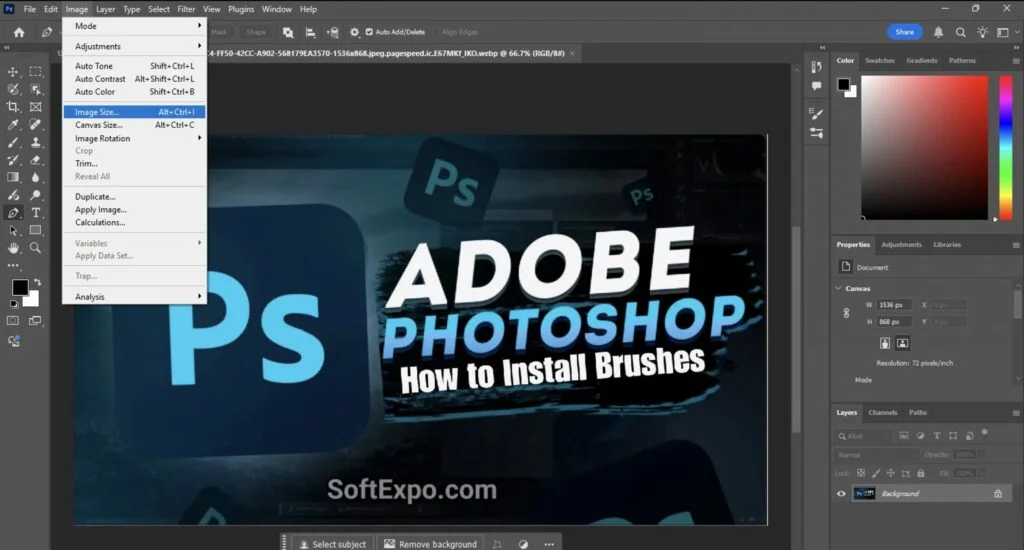
- Open the Image Size Dialog: With your image open in the main workspace, navigate to the top menu bar and click Image > Image Size. Alternatively, you can use the keyboard shortcut Ctrl + Alt + I.
- Check the Link Icon: Look for the chain link icon located between the 'Width' and 'Height' fields. Ensure this icon is activated (it should look linked, not broken). This locks the aspect ratio, preventing your image from becoming stretched or squashed when you change one dimension.
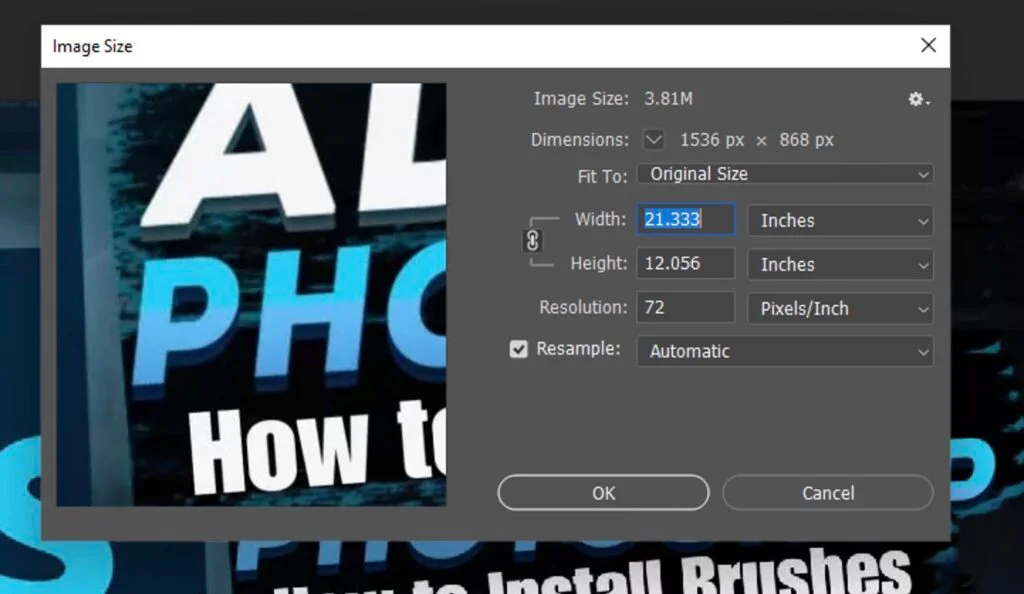
- Select Your Units: Click the drop-down menu next to the dimensions. Choose Pixels if you are designing for screens (web, email, social media) or Inches/Centimeters if you are preparing a file for print.
- Enter New Dimensions: Type your desired number into the Width or Height field. Because the link icon is active, Photoshop will automatically calculate the other number for you to maintain the correct proportions.
- Adjust Resolution (Optional): For web use, you can ignore the Resolution field (72 PPI is standard but doesn't affect pixel dimensions). For print, ensure this is set to 300 Pixels/Inch.
- Choose Resample Method: Click the 'Resample' drop-down. For most tasks, Automatic works well. However, if you are enlarging an image significantly, select Preserve Details 2.0 to reduce blurriness.
- Apply Changes: Click the OK button to confirm. Your image will update immediately.
- Save Your Work: To save the resized version without overwriting your original, go to File > Save As or use File > Export > Export As for web-optimized files.
Tips for Better Results
- Smart Objects are Safer: Before resizing, you can right-click your image layer in the Layers panel and select 'Convert to Smart Object'. This allows you to resize the layer multiple times without permanently destroying image quality.
- Don't Upscale Too Much: Enlarging a small image (upscaling) often results in quality loss. If you must enlarge a photo by more than 20%, try the 'Generative Upscale' or 'Preserve Details 2.0' features to use AI to fill in missing data.
- Web vs. Print: Remember that 'Resolution' (PPI) only matters for printing. A 1000px wide image looks the same on a screen whether it is 72 PPI or 300 PPI.
Common Mistakes to Avoid
Distorted Images: If your image looks stretched or squashed, you likely forgot to click the chain link icon in step 2. Undo (Ctrl+Z) and try again with the link active.
Confusing Image Size with Canvas Size: If you accidentally cropped your image instead of shrinking it, you may have used 'Canvas Size'. Ensure you always select Image Size for scaling the entire picture.