Description
Adding text overlays, titles, and lower thirds is a fundamental skill for any video editor using DaVinci Resolve. Whether you are labeling a speaker, creating a cinematic opening title, or adding subtitles, the Edit page provides a direct way to insert and customize typography. You will need DaVinci Resolve installed on your Windows machine and a project with video footage ready on the timeline.
What You'll Need
- Software: DaVinci Resolve 19 or 20 (Free or Studio version).
- Operating System: Windows 10 or 11 (steps are identical).
- Assets: An active project with video clips on the timeline.
Step-by-Step Guide
- Open the Edit Page: Launch DaVinci Resolve and click the Edit tab at the bottom center of the screen to access the main timeline view.
- Open the Effects Library: Look at the top-left corner of the interface and click the Effects button. This will expand a panel containing various tools.
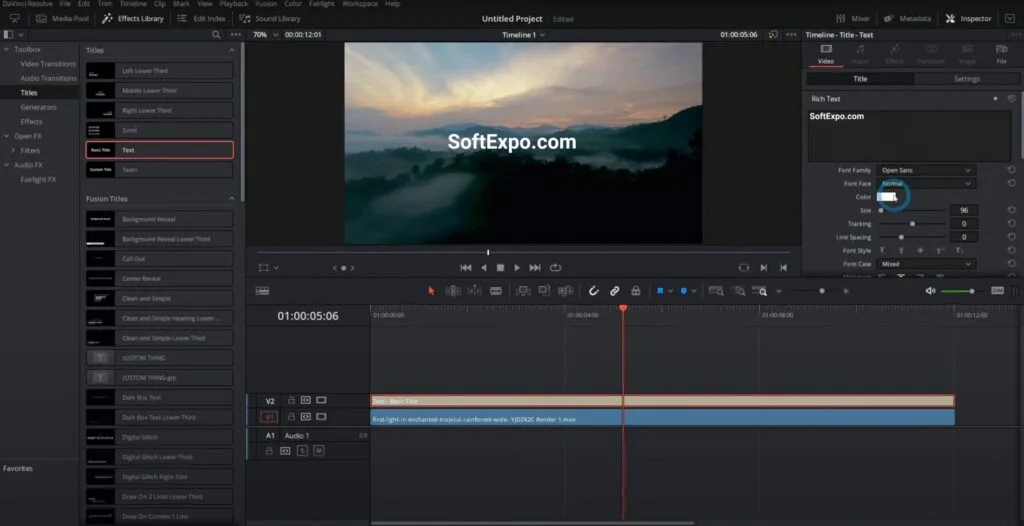
- Locate the Titles Category: In the Effects panel sidebar, scroll down to the Toolbox section and click on Titles. You will see a list of text options appear in the window next to it.
- Choose Your Text Type: Find Text+ (recommended for most users) or Text (Basic Title). Drag and drop your chosen title effect from the library onto a video track above your footage in the timeline.
- Select the Text Clip: Click the new text block on your timeline so it is highlighted in red. Ensure your timeline playhead (the red vertical line) is hovering over the text clip so you can see it in the preview window.
- Open the Inspector: Navigate to the top-right corner of the screen and click Inspector if it is not already open. This panel controls all properties of your selected clip.
- Edit the Content: Inside the Inspector, under the Title tab, locate the large text box (often labeled "Styled Text"). Delete the default "Title" placeholder and type your desired message.
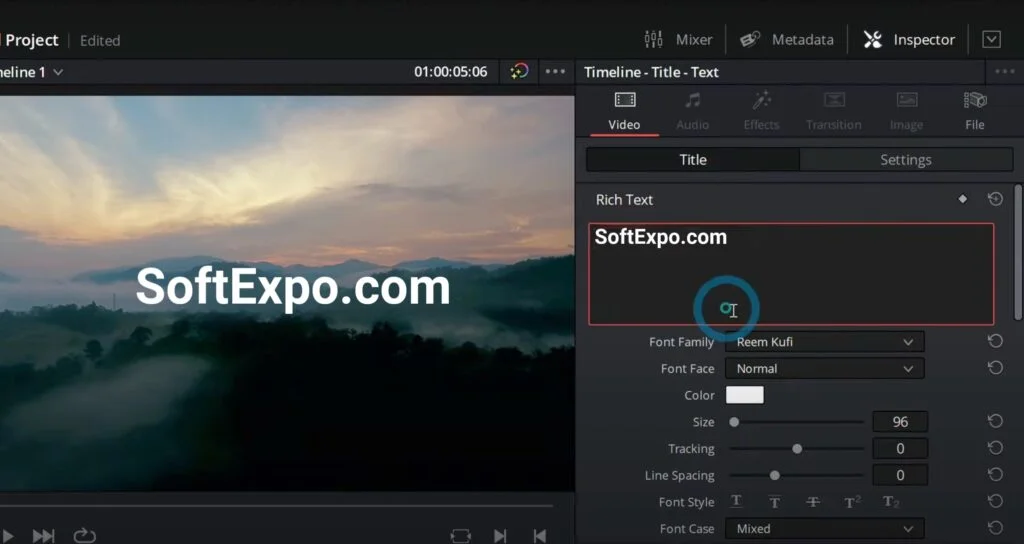
- Customize the Appearance: Use the controls immediately below the text box to adjust the Font Family, Face (Bold/Italic), Size, and Color.
- Position the Text: Switch to the Settings tab (next to the Title tab in the Inspector) to adjust the X and Y Position, or use the Layout controls within the Title tab for more specific alignment.
- Adjust Duration: On the timeline, hover your mouse over the right edge of the text clip until the cursor changes to a trim icon. Click and drag the edge to the right to make the text stay on screen longer, or to the left to shorten it.
Tips for Better Results
- Use Text+ for Animation: If you plan to add effects like a "Write On" animation or complex glowing borders later, always use Text+ instead of the basic Text tool.
- Duplicate Quickly: Hold the Alt key on your keyboard, then click and drag an existing text clip on the timeline to create an instant copy with the same formatting.
- Add a Drop Shadow: To make white text readable against bright video backgrounds, go to the Inspector, scroll down to Shading (Element 3 or 4 in Text+), and enable a black drop shadow.
- Render Cache: If playback becomes choppy while using complex Text+ titles, go to the playback menu and set Render Cache to "Smart."
Common Mistakes to Avoid
Text Disappearing: If you cannot see your text in the viewer, check that the video track containing the text is not disabled (look for a greyed-out film strip icon/orange track number on the far left of the timeline track).
Wrong Tab Selected: Beginners often try to edit text in the "Video" tab of the Inspector. Always ensure you are in the Title tab (marked by a T icon) to change the actual words and font.
How to Feather Edges in Photoshop: Easy and Fast Techniques

Avant Browser Top Alternatives: 2025 Guide