Orca Slicer is a highly specialized 3D printing application that translates digital three-dimensional models into the precise machine instructions required by FDM hardware. Forked directly from the Bambu Studio and PrusaSlicer codebases, this application targets 3D printing hobbyists, mechanical engineers, and print farm operators who require advanced machine tuning without leaving their primary workspace. Rather than forcing operators to rely on external web-based G-code generators or manual script editing to test printer limits, the software embeds physical testing models right into the main interface. It actively solves the friction of moving between different tuning utilities by centralizing file preparation, material flow calculation, and direct hardware control into a single window.
A dedicated desktop application is necessary because browser-based slicing utilities routinely struggle with the heavy computational loads required to process high-resolution mesh files and dense support structures. By running locally on Windows 10 or Windows 11, the application utilizes the local CPU to quickly calculate variable line widths, complex gyroid infill patterns, and organic tree supports without the latency of cloud processing. Local execution also allows the software to establish a direct local area network connection to the 3D printer's motherboard. This direct pipeline enables the application to stream live webcam feeds and render control dashboards straight into the user interface, bypassing the need for cloud-relayed commands.
Ultimately, this desktop application removes the typical fragmentation found in traditional 3D printing workflows. In older setups, an operator might slice a file in one program, open a web browser to generate a temperature tower, edit a text file to configure material pressure values, and then upload the final G-code through a secondary network interface. This software unifies those distinct steps. A maker can import a custom CAD export, paint multi-material support interfaces, generate a volumetric flow rate test, slice the build volume, and monitor the live extrusion process from one specific layout, keeping the entire fabrication cycle strictly contained.
Key Features
- Built-in Calibration Suite: Located directly in the top menu bar, this menu generates specific test prints for material flow rates, temperature towers, retraction distances, and vertical fine artifacts. Operators input their minimum and maximum parameters, and the application automatically applies the necessary modifiers and layer-change instructions without requiring manual G-code editing.
- Pressure Advance Tuning: Built to stop corner bulging and stringing, this tool provides three distinct generation methods—Tower, Line, and Pattern—to tune filament pressure. Operators select whether their machine uses a direct drive or Bowden extruder, and the slicer alters the generated test lines to help identify the exact compensation value for that specific spool.
- Native Device Dashboard: The Device tab eliminates the need to keep a separate web browser open for print management. Operators input their machine's local IP address, and the application embeds the full Mainsail, Fluidd, or OctoPrint web interface inside the workspace, enabling live webcam monitoring and temperature overrides during the printing process.
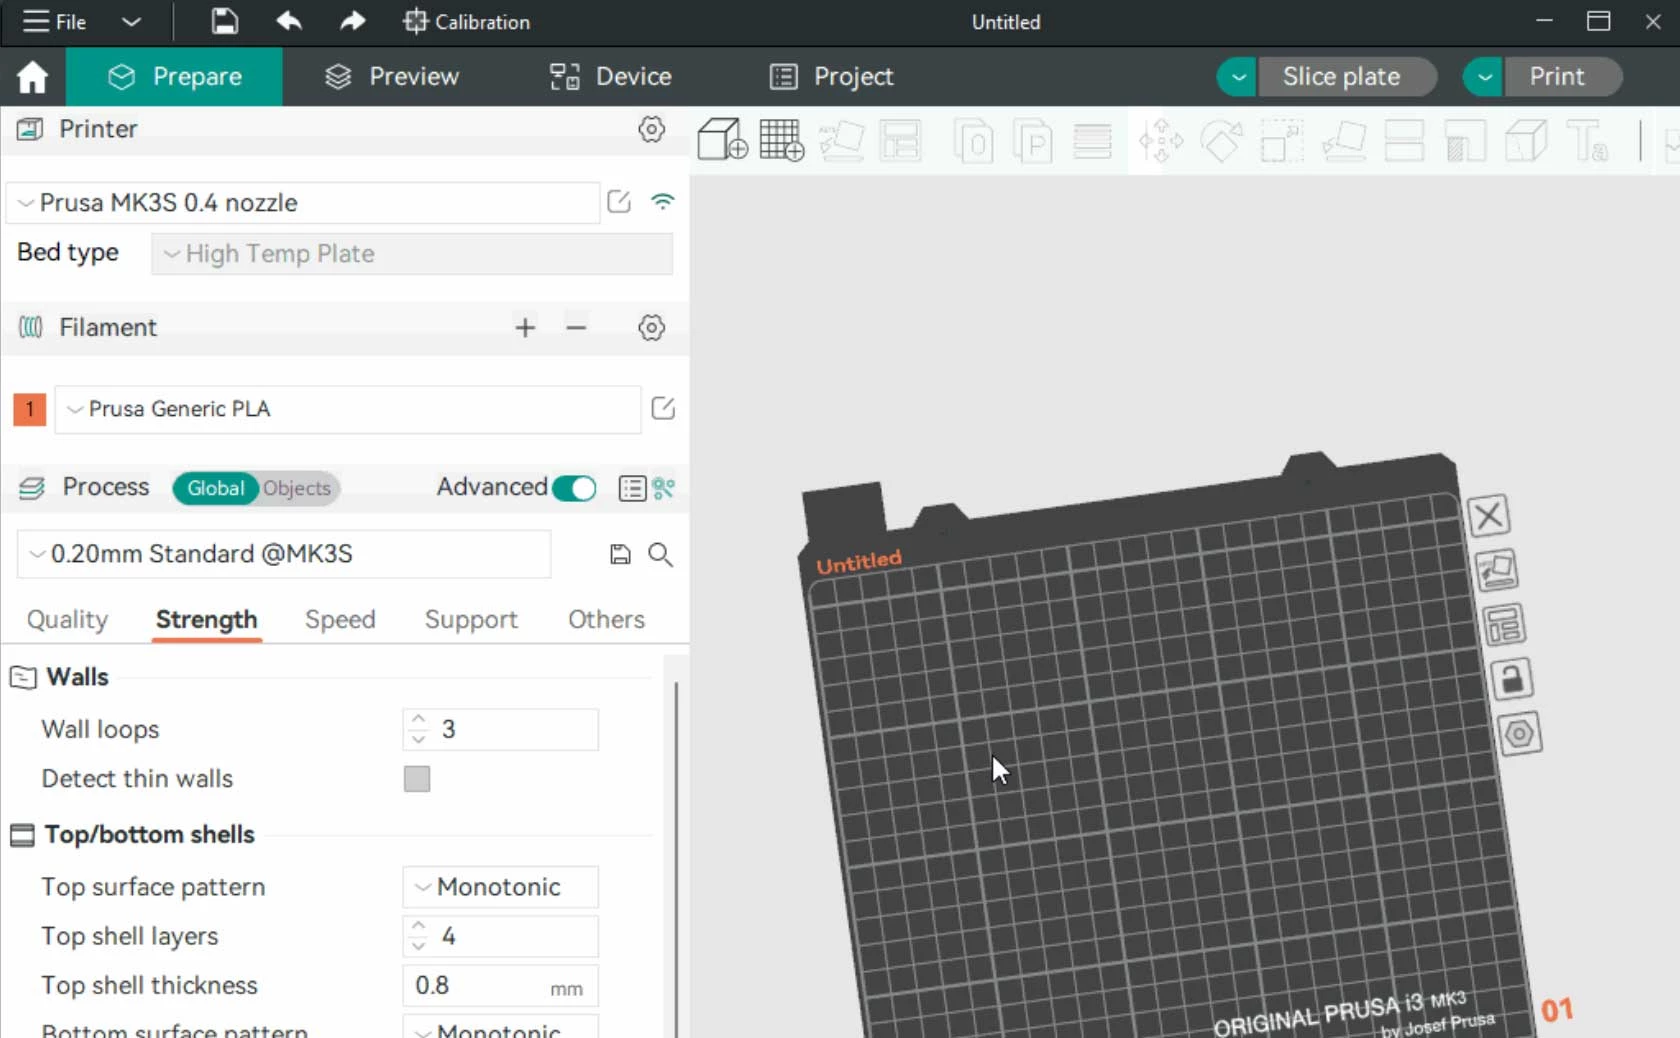
- Precise Wall Generation: This experimental but highly stable shell setting improves dimensional accuracy by adjusting outer wall spacing to maintain strict layer consistency. It is specifically intended for mechanical parts with low tolerances, ensuring that printed holes, mechanical gears, and interlocking joints fit together exactly as designed in the original CAD software.
- Sandwich Mode Perimeters: An advanced wall-printing strategy that alters the standard sequence by printing the inner wall, then the outer wall, and finally the second inner wall. This specific order provides the correct exterior dimensions of an outer-first approach while maintaining the high overhang stability of an inner-first approach, improving surface quality on complex geometries.
- Arachne Perimeter Engine: Rather than relying on fixed line widths, the application utilizes a variable line width engine to fill small gaps and trace thin details. When the toolpath encounters a wall section that is thinner than the standard nozzle diameter, it dynamically adjusts the material extrusion to ensure no internal gaps remain inside the shell.
- Advanced Seam Placement Controls: Located under the Quality tab, the application provides granular control over where layer start and stop points appear on the printed object. Operators can select Nearest to minimize travel time, Aligned to hide the seam along a single vertex, Back to push vertical lines to the rear of the build plate, or Random to break up the pattern on aesthetic models.
How to Install Orca Slicer on Windows
- Download the standard 64-bit Windows executable installer package intended for Windows 10 or Windows 11 from the official repository releases page.
- Double-click the downloaded executable file to initiate the installation wizard. If Microsoft SmartScreen displays an unrecognized application warning, click the "More info" text and select "Run anyway" to force the setup to continue.
- Review the default installation path, which typically defaults to the local Program Files directory, and confirm your desktop shortcut preferences before clicking the install button.
- Wait for the setup wizard to extract the core application files, then check the box to run the software immediately and click Finish to exit the wizard.
- Upon the first launch, the software will prompt for a geographic regional selection. Pick your physical location, which optimizes how the application connects to remote vendor servers to fetch machine profiles.
- The configuration wizard will display a vast list of printer vendors and models. Check the boxes next to your specific printer models and their corresponding nozzle sizes to import their exact mechanical limits and build volume dimensions.
- In the final wizard step, select the types of materials you plan to print, such as generic PLA, PETG, or ABS. This action populates the material dropdown menus in the main workspace, ensuring you have safe baseline temperatures ready before slicing your first model.
Orca Slicer Free vs. Paid
Orca Slicer is an entirely free, open-source application licensed under the AGPL. The application does not employ a freemium business model, meaning there are no premium tiers, pro versions, or enterprise subscriptions to purchase. Every available tool, from the variable Arachne wall routing to the complex flow rate calibration suites, is accessible to all operators immediately upon installation. The software is maintained collectively by an active community of contributors and a lead developer, relying strictly on voluntary donations and community code contributions rather than software sales or locked plugin ecosystems.
Because there is no commercial entity locking away advanced tools, operators do not have to navigate trial limits, export restrictions, or embedded watermarks on their generated files. The application allows for unlimited slicing operations and unrestricted access to high-speed profiles for all supported hardware. You do not need to buy a specific brand of printer to unlock specific slicing capabilities; the multi-material painting options and local network interfaces work just as effectively on a custom DIY build as they do on a commercial unit.
Furthermore, the application does not force operators into a mandatory cloud environment. While you have the option to log in to specific vendor accounts for remote cloud-printing features—such as linking to a Bambu Lab account for remote monitoring over the internet—the application functions entirely offline for standard slicing and local network printing. Makers can load digital models, edit support structures, and save compiled G-code directly to a local startup disk or SD card without ever requiring an active internet connection or verifying a digital license key.
Orca Slicer vs. PrusaSlicer vs. UltiMaker Cura
PrusaSlicer provides a highly reliable slicing environment heavily optimized for the Prusa hardware ecosystem. It excels in generating custom organic supports, variable layer heights, and multi-material toolpaths with high stability. However, users running heavily modified Klipper machines or non-Prusa coreXY systems often find that importing custom high-speed profiles requires manual tweaking, and the software lacks built-in menu generators for tuning pressure advance directly on the build plate.
UltiMaker Cura is one of the oldest open-source slicers available and remains incredibly popular due to its massive plugin marketplace and thousands of community-made printer profiles. It offers deep customization of individual print settings and is extremely forgiving for beginners navigating basic FDM printing. Yet, out of the box, it relies heavily on third-party plugins to execute advanced calibration tests, and its standard user interface can feel disjointed when trying to manage modern networked printers, frequently requiring separate browser windows.
Orca Slicer is the better fit for makers who want an all-in-one control center built specifically for modern, high-speed fabrication. It takes the solid foundational routing of PrusaSlicer and adds the clean interface and remote device management of Bambu Studio, while implementing native, step-by-step calibration menus that neither competitor provides by default. For operators running Creality, Voron, or custom Klipper setups who want to tune their flow rates perfectly and monitor their live webcams without switching applications, this software delivers the most unified desktop workflow.
Common Issues and Fixes
- SmartScreen blocks the initial installer. Windows security features may flag the executable file because it comes from an open-source code repository rather than a recognized commercial publisher. Click "More Info" on the blue popup window, then select "Run anyway" to proceed with the local installation.
- Calibration tests fail to alter printer flow behavior. When printing a flow rate test on specific smart printers, the machine's firmware may attempt to run its own automatic lidar calibration, overriding the slicer's manual G-code modifiers. Uncheck the "Flow calibration" box in the print dialog window before sending the test plate to the printer.
- Gaps appear between the outer walls and solid infill. This typically indicates the filament flow ratio is set too low for that specific material spool. Run the Flow Rate Pass 1 and Pass 2 tests from the top calibration menu, use the resulting formula to calculate the exact extrusion percentage, and save the updated number to your filament profile.
- Device tab refuses to load the printer interface. The software cannot connect to the hardware if the machine profile contains the wrong local network address. Click the Wi-Fi icon next to the printer name in the left panel and ensure the exact local IP address, including the correct port number, is entered for your Klipper or OctoPrint instance.
- Multi-part files load as separate floating objects. Dropping a complex STEP or 3MF file into the workspace might scatter the components across the build plate instead of keeping them assembled in their original positions. When importing the file, select "Yes" when the software asks if the multiple objects should be loaded as a single part with multiple parts, maintaining their original CAD coordinates.
Version 2.3.1 — October 2025
- Added "Extra Solid Infill" feature: Users can now reinforce specific sections of a model by inserting solid layers at custom heights without altering the overall infill density.
- New Fuzzy Skin capabilities: Introduced a "Fuzzy Skin Painting" tool to apply textures to targeted areas and a new "Extrusion Mode" for generating fuzzy skin based on flow rather than displacement.
- Improved Infill Rotation controls: implemented a template-based system for sparse infill rotation that prevents conflicts with direction settings and offers more consistent internal structure handling.
- Expanded Printer & Language Support: Added built-in profiles for Sovol SV08 MAX, Flyingbear, and Rolohaun Delta Flyer, plus updated Portuguese and Turkish translations.
- Fixed Prusa model identification: Resolved a regression bug where Prusa MK3S and MINI printers were incorrectly detected.
- Fixed 3MF import crash: Addressed stability issues when loading geometry-only 3MF files saved from alpha versions.
- Optimized Z-axis movement: Enhanced G-code generation for smoother Z-axis travel and disabled "smooth spiral" during input shaping calibration to prevent data interference.