FireAlpaca serves as a highly specialized digital painting and comic creation environment designed to prioritize drawing speed and interface clarity. For digital artists, illustrators, and hobbyists navigating a landscape of increasingly heavy creative suites, this application provides a focused workspace that strips away unnecessary bloat. Rather than functioning as an exhaustive photo manipulation tool loaded with complex image filters, the software is strictly built around the needs of individuals who rely on graphics tablets to sketch, ink, and paint directly on the digital canvas. It bridges the gap between basic built-in sketching utilities and highly complex, multi-layered professional graphic applications by offering essential illustration tools without dragging down overall system performance or cluttering the workspace.
Real work in digital illustration requires precise brush control, stable rendering, and immediate access to canvas manipulation shortcuts. Users choose FireAlpaca specifically to solve practical daily drawing tasks: drafting manga pages, practicing digital inking techniques, coloring complex line art, and producing short frame-by-frame GIF animations. Because the application launches almost instantly and consumes minimal background memory, it allows artists working on older desktop computers or low-spec laptop hardware to maintain a highly fluid drawing rhythm. Instead of waiting for a heavy engine to initialize before jotting down a quick visual idea, artists can immediately open a new canvas, select a custom pencil tool, and begin marking up their concepts without hesitation.
The desktop client format remains strictly essential for this type of creative workflow compared to browser-based alternatives or lightweight mobile apps. Drawing tablet inputs, localized pressure sensitivity curves, and heavy layer manipulation demand direct access to local machine resources that web applications struggle to maintain consistently over extended periods. By relying on a native desktop executable, FireAlpaca guarantees that rapid pen strokes translate immediately to the digital canvas without unexpected input latency or frustrating network dependency. This localized hardware environment also ensures that artists can save massive, high-resolution project files directly to their hard drives, keeping their working directories completely secure and instantly accessible during long drafting sessions.
Key Features
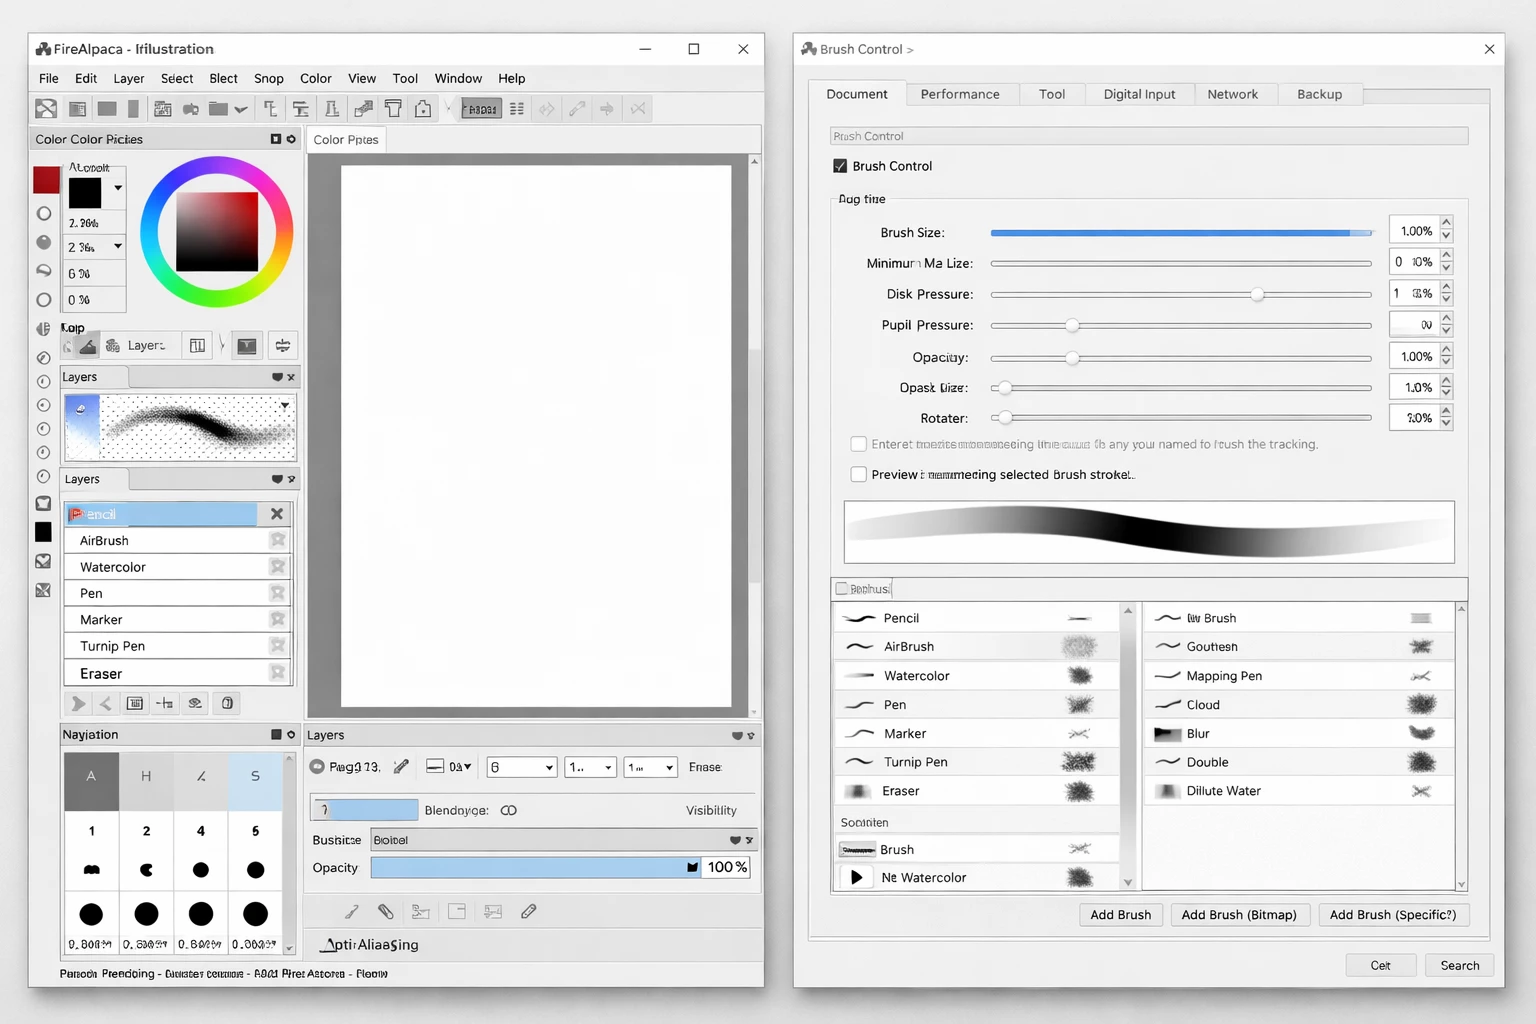
- Brush Engine and Stabilizer: The built-in correction tool smooths out natural hand jitter in real time, allowing digital inkers to create clean, sweeping strokes without rigid artificiality. Users can precisely adjust the stabilizer value via a dedicated dropdown menu on the top toolbar, customizing the intensity of the correction based on how fast they draw. The underlying brush engine also natively supports importing custom scatter textures or writing highly specific stroke behaviors using the Lua scripting language.
- Comic Canvas Templates: Setting up a new project for graphic novel production involves strict dimension requirements, safety margins, and bleed areas. When creating a new file, the user interface includes a dedicated comic tab that generates standard professional print or doujinshi page layouts automatically. Users can then apply the built-in panel layout slicing tools to cut the canvas into distinct comic frames with mathematically precise gutter spacing.
- Animation Mode and Onion Skinning: Beyond static illustrations, the main interface includes a specialized toggle specifically for drafting frame-by-frame movement. By enabling Onion Skinning from the main View menu, the active canvas displays faint red and green translucent overlays of the previous and subsequent frames, mimicking traditional animation lightboxes. Artists draw sequential movements across separate distinct layers and then utilize the auto-play window to preview the timing accurately before exporting the sequence.
- Perspective Snap Guides: Constructing accurate architectural backgrounds requires strict adherence to distant vanishing points. The application features a dedicated snap menu permanently located at the top of the workspace that strictly forces brush strokes to follow specific geometric rules. Artists can activate parallel snaps for action speed lines, radial snaps for dramatic focus points, or fully interactive 3D perspective grids to ensure background buildings and interior rooms scale correctly as they recede into the distance.
- Multi-Layer Blending and Masking: Organizing complex digital color work relies on a familiar non-destructive layer stack system. Artists visually separate line art, flat base colors, and atmospheric shading into distinct folders, utilizing the clipping mask checkbox to strictly keep shadow details within the exact boundaries of the base color layers. The layer properties panel includes standard essential blending modes such as Multiply for darkening ambient shadows, Screen for isolating bright highlights, and Overlay for adjusting global color contrast safely.
- Cloud Brush Store: Finding the exact right texture for wet watercolor blending or retro halftone shading is heavily streamlined through an integrated online asset repository. Instead of actively scouring external forums for compatible brush packs, users can simply open the primary brush panel and access a constantly updated curated library of custom tools uploaded directly by the community. Clicking an individual item in the digital store immediately downloads and appends it to the active brush list for instant application on the canvas.
- Time Lapse Recording: Reviewing the raw drawing process is a critical part of studying painting techniques or sharing finished artwork on social platforms. The application tracks canvas progress quietly in the background, logging individual brush strokes and complex layer adjustments without noticeably impacting general rendering speed. Once a piece is completely finished, the artist can export this internally recorded history as a condensed video file, neatly showcasing the entire progression from rough initial sketch to final rendered image.
How to Install FireAlpaca on Windows
- Download the compressed installation archive directly from our website to your local storage drive.
- Extract the downloaded ZIP or RAR archive into a brand new folder on your desktop using your preferred file extraction utility.
- Open the included readme.txt file located securely in the newly created folder to review any specific pre-installation notes or hardware compatibility warnings.
- Double-click the extracted setup executable file inside that same folder to officially launch the main installation wizard.
- Proceed through the standard setup prompts, explicitly accepting the end-user license agreement and leaving the default destination path set to your primary program files directory unless you specifically require a custom drive location.
- Choose whether to generate a convenient desktop shortcut and click the final confirmation button to begin copying the necessary core application files to your system storage.
- Close the installer wizard completely and launch the application directly from your new desktop shortcut; note that a sponsor advertisement window will appear on the first launch, which you can immediately dismiss by pressing the Enter or Escape key.
FireAlpaca Free vs. Paid
The standard iteration of FireAlpaca operates strictly as a freeware application, meaning the core digital drawing utility is entirely free to download, install, and utilize for both private personal sketches and professional commercial projects. The developers actively sustain this specific business model through integrated sponsorship placements rather than restricting critical feature access behind forced paywalls. When users open the standard desktop client, a small sponsor advertisement window predictably appears upon initial startup. This pop-up typically displays hardware deals or software promotions directly related to digital art, and it can be closed immediately without interfering with the actual drawing workspace. No credit card is required at any point, and there are absolutely no monthly subscription fees necessary to access the full layer stack, comic paneling tools, or timeline animation features.
For active daily users who explicitly want to bypass the startup advertisement entirely, the developers offer a premium alternative named FireAlpaca SE, which is available for a one-time purchase fee of $39.99 on digital storefronts such as Steam. This specific tier drops the freeware sponsorship model completely, allowing the application to boot directly into the blank canvas without any visual interruptions. Because it is securely sold as a permanent license, artists do not have to worry about frustrating recurring charges, unexpected server check-ins, or sudden price hikes that are incredibly common with modern cloud-based creative suites.
While the actual core drawing tools and fundamental layer capabilities remain largely identical between the two specific editions, the paid SE tier includes a few distinct architectural enhancements. It runs on a specialized secondary brush engine specifically designed for slightly faster file compiling and heavily reduced memory overhead during demanding painting sessions. Additionally, the SE edition provides a highly requested dark user interface option, exclusive scatter brush mechanics, and direct access to priority developer support for safely recovering corrupted save files. However, hobbyists can comfortably rely on the free tier indefinitely without ever feeling artificially limited by missing tools.
FireAlpaca vs. Krita vs. Clip Studio Paint
Krita operates as a highly specialized, open-source digital painting application that heavily caters to concept artists, 3D texture painters, and digital matte creators. It features an incredibly complex brush engine, deep color management profiles, and extensive workspace layout customization that genuinely rivals expensive enterprise tools. Professional artists choose Krita specifically when they need non-destructive filter layers, complex alpha masking, and advanced color-picking tools for heavy rendered oil paintings. However, this dense complexity naturally requires a significantly steeper learning curve and demands substantially more processing hardware. On older desktop machines, Krita can frequently feel sluggish during large canvas operations or heavy file saves, making it somewhat less ideal for quick daily sketching sessions where immediate speed is the primary concern.
Clip Studio Paint officially stands as the professional industry standard for manga production, commercial comic illustration, and long-form 2D animation. It provides advanced vector-based inking layers that uniquely allow artists to adjust specific line thickness long after drawing, an extensive catalog of fully posable 3D reference models, and multi-page document management for publishing entire graphic novels. Professionals actively choose Clip Studio Paint because it provides literally every conceivable tool necessary for commercial comic creation directly from initial draft to final print. The main downside remains its strict cost structure; the software currently requires either a substantial one-time license fee for older legacy standalone editions or an ongoing monthly subscription for the latest ongoing updates, which can be highly prohibitive for casual weekend users.
FireAlpaca occupies a highly practical middle ground by actively prioritizing immediate responsiveness and general approachability over exhaustive feature sets. When an artist needs to quickly draft a comic page layout, set up a basic mathematical perspective grid, or rough out a simple character walk cycle without navigating dense nested menus, this application delivers a thoroughly friction-free experience. It runs perfectly smoothly on aging laptop hardware that would typically struggle to properly load Krita or Clip Studio Paint. Users ultimately choose FireAlpaca when they simply want the absolute core necessities of digital illustration—stabilized brushes, clean comic panels, and functional clipping layers—packaged neatly in a lightweight desktop environment that lets them focus entirely on drawing.
Common Issues and Fixes
- Pen pressure sensitivity not registering. Go directly to the primary File menu, select Brush Environmental Settings, and manually switch the input API option from Tablet Coordinate to Mouse Coordinate. If this fails, strictly ensure your digital drawing tablet drivers are fully updated and completely installed before you plug the USB device into your computer, as hardware conflicts frequently override localized application pressure curves.
- Significant brush lag during fast strokes. Check the specific Stabilizer dropdown numerical value located actively on the top toolbar directly above the canvas workspace. Values higher than 25 force the engine to constantly calculate complex smoothing algorithms, which heavily strains older computer processors. Dropping the value down to 10 or 15 will immediately restore drawing responsiveness while still keeping inked lines exceptionally clean.
- Custom brushes disappear after restarting. This frustrating bug typically occurs when the active configuration files fail to save properly because of external background file-locking conflicts. Navigate to the Help menu, open the Config Folder, and verify that background cloud sync services are not actively locking the application's configuration directory. Once verified, manually back up your initialization file to a completely separate folder to prevent permanent data loss.
- Color picker grabs the wrong background tone. This specific mapping error is frequently caused by graphical hardware acceleration conflicts with other secondary applications running simultaneously. Open your local Windows Task Manager, completely close any resource-heavy background applications such as digital game launchers, and actively restart the drawing application. This process permanently restores proper color grabbing behavior across all primary brush tools.
- Canvas rendering freezes during transformations. When heavily scaling or rotating massive high-resolution layers with complex textures, the temporary application memory cache can unexpectedly max out. Save your current project file, completely restart the application to manually flush the graphical memory buffer, and ensure your specific canvas dimensions are properly optimized. Operating within your specific hardware limits prevents secondary rendering failures before attempting complex geometric modifications.
Version 2.13.26 — October 2025
- Introduced continuous time-lapse recording functionality for uninterrupted session capture
- Added visual recording indicator icon that appears in the canvas's upper-left corner during time-lapse sessions
- Enhanced onion skin feature with customizable frame count display options
- Implemented animation loop support for onion skin visualization
- Expanded compatibility with ARM-based Windows devices through dedicated installer support
- Resolved brush texture rendering problems that were present in the previous version
- Improved brush search functionality to ignore letter case differences