Nero Video establishes itself as a focused local production environment built for Windows users who need to bridge the gap between quick video assembly and long-term physical media archiving. While the software market is saturated with browser-based timeline editors and subscription-heavy post-production suites, this application focuses on offline media handling. It processes raw footage directly from smartphones, action cameras, and traditional camcorders without requiring the user to upload gigabytes of data to a cloud server before making a single cut. Users rely on this desktop architecture to maintain full control over their source files and project render quality.
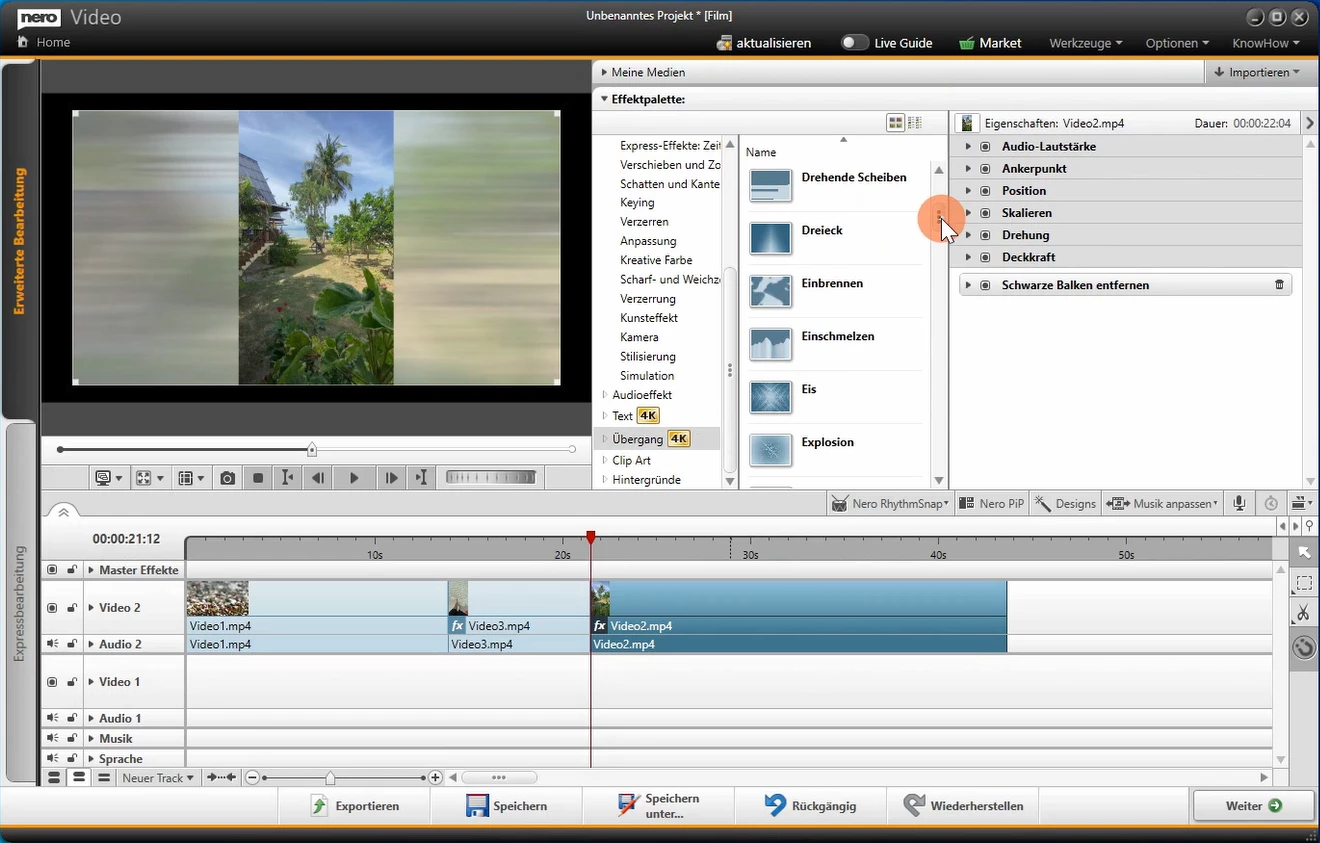
The application is built around a distinct dual-interface design that caters to different project scopes. Instead of forcing casual users into a complex timeline full of confusing panels, the software provides an Express Editing mode for fast storyboard-style clip arrangement, alongside an Advanced Editing mode for multi-track layering and keyframe adjustments. This structural choice allows users to draft a basic sequence quickly, apply a visual theme, and then switch into the advanced workspace to tweak specific audio levels or picture-in-picture placements. It serves as a practical bridge for editors who want to graduate from basic mobile editing tools to a standard desktop workflow.
Beyond standard timeline editing, the software retains a strong focus on disc authoring, a feature that many modern video suites have abandoned. For event videographers, family historians, and physical media enthusiasts, the ability to build custom menus, define chapter markers, and burn projects directly to DVD or Blu-ray remains a critical requirement. The application combines the editing phase and the authoring phase into a single continuous workflow, meaning users do not need to export a massive video file only to import it into a separate burning tool. This unified approach makes it a practical choice for anyone who still distributes or archives their final video projects on optical media.
Key Features
- Express and Advanced Editing Modes: The interface divides the workflow into two distinct workspaces to match the project scale. The Express mode uses a storyboard layout for rapid clip sequencing and quick theme application, while the Advanced mode opens a standard multi-track timeline for precise frame cutting, audio mixing, and keyframe animation.
- Physical Disc Authoring: Users can export their finished timeline directly into a dedicated disc creation module equipped with 2D and 3D animated menu templates. The tool allows editors to set custom chapter markers, design background screens, and author the final output to standard DVDs, Blu-ray discs, or local image files for later duplication.
- RhythmSnap Audio Syncing: To simplify the process of editing footage to music, this tool analyzes a selected background audio track and places markers on the timeline beats. Editors can then align their video cuts and scene transitions exactly with the rhythm of the music, resulting in a more dynamic and structured final sequence.
- Picture-in-Picture and Chroma Key: The Advanced workspace includes specific modules for layering multiple video tracks, allowing users to create reaction videos or composite scenes. The PiP Effects window offers pre-configured layout animations, while the green screen tool isolates subjects from solid-color backgrounds so they can be placed over new digital environments.
- 1-Click Video Story: Designed for editors working with large batches of event footage, this automation tool takes a folder of raw clips and automatically generates a structured draft. It applies a chosen visual theme, inserts transitional effects, adds a synced background track, and generates standard opening titles and closing credits to save manual layout time.
- Direct 4K Export and Device Streaming: The software supports importing and rendering high-bitrate 4K footage without requiring proxy files for basic edits. Once a project is finished, users can export the file locally, or use the built-in streaming player to cast the final render directly to a smart television on the same local network.
How to Install Nero Video on Windows
- Download the standalone installer: Obtain the official offline setup package from the vendor website to ensure you have the complete core files rather than a stub installer that requires a continuous download stream.
- Launch the setup wizard: Double-click the downloaded executable file to initiate the extraction process, and accept the necessary administrator prompts to allow the installer to modify your local storage.
- Install the core components: Follow the on-screen dialogue to copy the application files to your primary drive. The setup dictates the directory path for the core program files, which default to your primary system partition.
- Wait for the launcher setup: Alongside the video editor, the installer will automatically deploy the central hub application, which acts as the mandatory license manager for the entire software suite.
- Log into your account: Once the installation finishes, the hub will open automatically. You must enter your registered email address and the specific password provided in your purchase confirmation email to authenticate the software.
- Set your default application: If your account contains multiple products from the developer, navigate the hub settings to select your specific video editor as the primary application.
- Launch the editing workspace: Return to the main Start page within the hub and click the Open button next to the video editor icon. From here, you can select the prompt to make a new movie and begin your local timeline project.
Nero Video Free vs. Paid
The application operates entirely as a commercial product, meaning there is no permanent free tier available for users to export finished projects without restriction. The developer does offer a trial period, which allows prospective buyers to install the software, test the dual-mode interface, and experiment with the disc authoring tools. However, projects exported during this trial phase may be subject to limitations, making the trial strictly a testing environment rather than a viable tool for final production. To unlock full 4K rendering and clean exports, users must purchase a license.
When buying the software, users face two distinct licensing paths: a standalone perpetual license or a bundle within the developer multimedia suite. The standalone license is a one-time purchase that grants permanent offline access to the specific version of the video editor you buy. This perpetual model means you will receive security patches and minor bug fixes for that specific release cycle, but you will not receive major feature upgrades in the future without paying for a new license. This is often the most economical choice for users who only need the video timeline and disc authoring tools without paying for extra system utilities.
Alternatively, the software is packaged inside the developer Platinum suite, which includes photo managers, upscaling tools, and system utilities. This suite is sold either as a one-time perpetual license for approximately $119 or as an annual subscription starting around $45. The subscription guarantees that the user always has the newest interface updates and artificial intelligence models, but access is revoked if the payment lapses. Regardless of the tier chosen, the software relies on the centralized launcher for activation, meaning an active internet connection is required to log in and verify the license before the offline editing tools become fully available.
Nero Video vs. CyberLink PowerDirector vs. Corel VideoStudio
CyberLink PowerDirector targets users who need high-speed rendering and advanced visual effects that go beyond basic timeline assembly. It heavily emphasizes artificial intelligence tools, offering automated object removal, sky replacement, and advanced motion tracking that allows text or graphics to follow moving subjects precisely. Its rendering engine is notably faster than many competitors when handling heavy 4K timelines, making it a better fit for content creators and YouTubers who need to turn around high-resolution videos quickly and frequently.
Corel VideoStudio focuses on providing a visual, accessible interface while offering specialized features like 360-degree video editing and deep multi-camera synchronization. It includes built-in screen capture utilities and advanced audio ducking, which automatically lowers background music when dialogue is detected. Users who need to edit complex virtual reality footage or sync multiple camera angles from a podcast shoot will find Corel toolset far more capable for those specific technical workflows.
Nero Video remains the better choice for users who prioritize physical media creation and straightforward, template-driven editing over complex visual effects. While it lacks the rendering speed of PowerDirector and the 360-degree tools of VideoStudio, its built-in DVD and Blu-ray authoring module is vastly superior for event videographers who still need to deliver physical discs with interactive menus. Furthermore, its dedicated Express mode and budget-friendly standalone perpetual license make it a practical option for casual users who just want to merge clips, sync them to music, and burn an archive disc without paying a recurring subscription.
Common Issues and Fixes
- Missing desktop shortcut after setup. The installation process does not typically place a direct executable icon for the video editor on the Windows desktop. To fix this, open the Windows menu, search for the centralized hub application installed alongside the editor, and launch the editor from within that dashboard.
- Software fails to activate offline. Even if you download the offline installation package, the core hub application requires an active server ping to verify your license credentials. Ensure your firewall is not blocking the hub, connect to the internet temporarily to log in, and allow the software to authenticate your account.
- Timeline playback stutters with large files. Editing dense 4K footage can cause the preview window to drop frames if your hardware is strained. To resolve this, switch from the Advanced workspace to the Express storyboard mode to arrange your heavy clips smoothly, or reduce the preview playback resolution in the settings menu before applying complex effects.
- Unexpected re-encoding during disc burning. When moving a finished project into the authoring module, the software may attempt to compress the video again, causing long delays and quality loss. Prevent this by ensuring your initial timeline project settings—specifically resolution and frame rate—exactly match the target Blu-ray or DVD specifications before you begin editing.
Version 2026 — November 2025
- Added new Dark Mode interface to the video editing workspace, designed to reduce eye strain during extended editing sessions and minimize visual distractions.
- Introduced "Restoration" AI model in the Video Upscaler, specifically optimized to recover fine details and textures in low-quality or old footage.
- Improved Screen Recorder functionality with support for capturing video in 4K resolution at 60 frames per second (FPS).
- Added Smart Zoom feature to the recorder that automatically zooms in on mouse clicks or allows for manual precision zooming up to 4x.
- Implemented batch import capability for video upscaling, allowing multiple files to be processed in a single queue.
- Expanded duplicate detection to identify and manage exact duplicate video and audio files to reclaim storage space.