When your computer suffers from random crashes, inexplicable Blue Screens of Death, or corrupted data, the culprit is often a failing memory stick. PassMark MemTest86 operates as a standalone diagnostic tool designed to rigorously stress-test your RAM without loading an operating system, ensuring that software conflicts do not interfere with the results. Operating directly from a bootable USB flash drive, the application takes complete control of the system hardware. This direct access allows the testing algorithms to interrogate every single addressable memory cell, bypassing the restrictions that normally hide critical hardware faults. By operating independently of the main storage drive, it ensures that background services, driver conflicts, and software bugs are removed from the diagnostic equation. If a system crashes while the tool is active, technicians immediately know they are dealing with a severe hardware failure rather than a corrupted registry or a bad graphics driver.
System builders, IT professionals, and overclockers rely heavily on this utility to verify hardware stability before deploying a machine into a production environment. Memory degradation can manifest in incredibly subtle ways, such as a single flipped bit that only occurs when the chips reach a specific temperature under heavy load. Rather than simply reading the factory specifications and assuming the hardware is healthy, the application aggressively writes highly specific data patterns to the memory addresses and reads them back to verify structural integrity. This methodical approach exposes faulty modules, bad sectors, voltage drops, and thermal-induced errors that a standard boot-up check ignores. Overclockers use it extensively to validate custom timings and frequencies, ensuring their performance tweaks do not compromise long-term data safety.
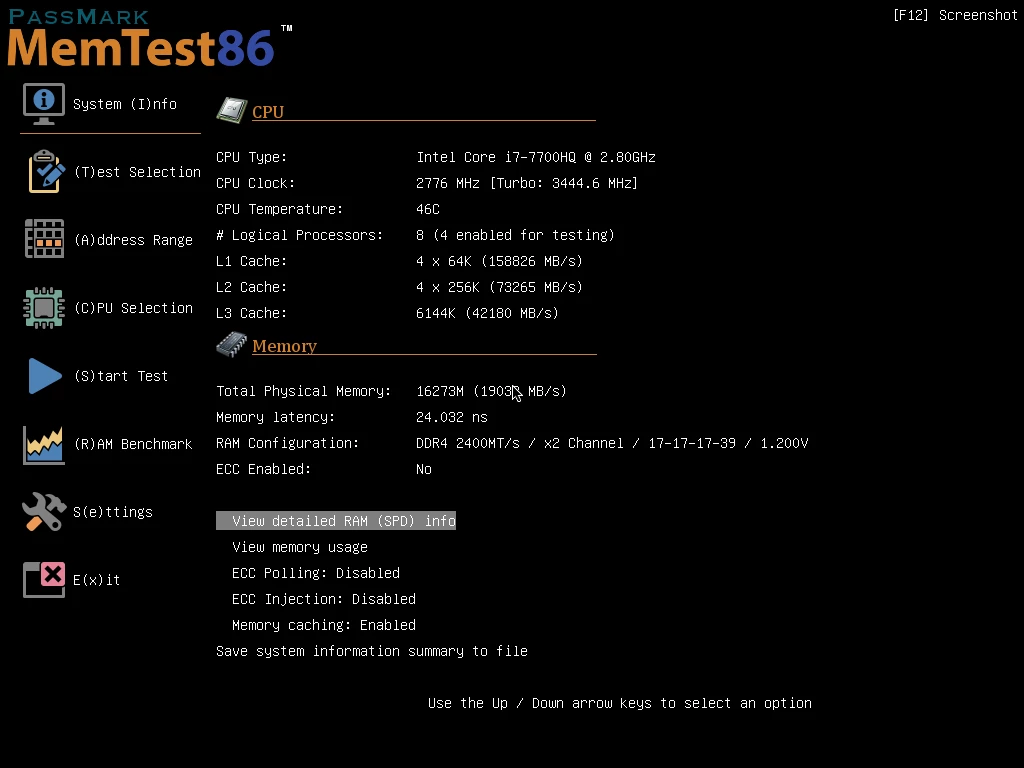
Relying on an operating system-based memory scanner is fundamentally flawed because the operating system itself locks away large portions of the physical memory for its own kernel operations. A desktop application running inside a window simply cannot test the RAM that is currently holding the operating system interface, the active drivers, and the testing application itself. Running a dedicated bootable environment guarantees that the maximum possible memory capacity is exposed to the testing algorithms. From older desktop modules to modern high-density server-grade memory, the tool identifies physical hardware degradation with extreme precision. It provides the data necessary to pinpoint which specific component has failed, allowing users to confidently replace the exact failing hardware instead of guessing which part of their computer is responsible for the instability.
Key Features
- 14 Advanced Testing Algorithms: The software executes a highly specialized suite of stress tests, including moving inversions, bit fade, and random number sequences. It specifically incorporates row hammer fault detection, which rapidly accesses the same memory row to see if electrical interference causes bits to flip in adjacent rows. These algorithms push memory cells far beyond normal daily workloads to expose hidden leakage or degradation.
- Hardware-Level Fault Decoding: When an error occurs on supported motherboards, the interface displays the exact physical location of the failure. It translates complex memory addresses into specific hardware identifiers, pointing the user directly to the faulty module and the exact chip on that module. This prevents technicians from discarding an entire multi-stick kit when only a single component requires replacement.
- UEFI and Secure Boot Compatibility: The boot loader operates natively within modern PC firmware environments, providing a graphical interface with full mouse support. Because the executable is officially signed by Microsoft, users do not have to manually disable Secure Boot in their motherboard settings to launch the diagnostic environment. This drastically simplifies the testing process on strict corporate networks or locked-down hardware.
- DDR5 and XMP Profile Integration: The tool actively reads Serial Presence Detect data to display accurate timings, voltages, and frequencies for modern memory architectures. It automatically recognizes factory overclocking profiles, allowing users to test their memory at its rated high-performance speed rather than the motherboard default baseline. This ensures that the memory is stable under the exact conditions it will experience during heavy daily use.
- ECC Error Detection and Injection: Designed with enterprise hardware in mind, the application interfaces directly with Error Correcting Code memory controllers on workstation and server motherboards. It logs corrected hardware errors that the system would normally hide from the user, revealing failing modules before they cause uncorrectable crashes. Administrators can even inject false errors into the system to verify that the motherboard ECC monitoring protocols are functioning correctly.
- Automated Configuration Files: Administrators can deploy the tool across hundreds of machines using pre-configured text files. By setting specific parameters in a configuration file, the software can bypass the user interface, automatically run a specific sequence of tests, and save the results without any human interaction. This is particularly useful for assembly lines or repair centers that process identical hardware configurations in bulk.
- Exportable Diagnostic Reports: Upon completing a test cycle, the software generates highly detailed HTML reports and saves them directly to the bootable USB drive. These reports contain the exact hardware specifications, test durations, error counts, and specific failure addresses discovered during the session. Technicians can open these files on a separate computer to maintain detailed client records or to provide proof of hardware failure for warranty claims.
How to Install PassMark MemTest86 on Windows
- Download the official Windows USB installation package, which arrives as a compressed ZIP archive containing the bootable image and the writing utility.
- Extract the entire contents of the ZIP archive to a dedicated folder on your local storage drive, ensuring all necessary files remain in the same directory.
- Insert an empty USB flash drive into an available port on your computer, keeping in mind that the upcoming process will permanently erase all existing files on this drive.
- Launch the imageUSB application included in the extracted folder, running it with administrator privileges to prevent background security software from blocking the format process.
- In the utility interface, carefully select your target USB flash drive from the list of available devices, double-checking the drive letter to avoid accidentally overwriting a different storage volume.
- Click the Write button to format the drive and copy the bootable image bit-by-bit; the utility will create specific partitions that the Windows operating system may not natively recognize once the process finishes.
- Leave the USB drive plugged into the computer and restart the system entirely.
- As the computer turns back on, rapidly press the assigned boot menu key for your specific motherboard (often F8, F11, or F12) and select the USB flash drive from the list to launch the testing environment.
PassMark MemTest86 Free vs. Paid
The application operates on a freemium model, offering a highly capable base version alongside premium tiers designed for enterprise and enthusiast use. The Free edition covers the core diagnostic requirements for home users and standard system builders. It includes the standard array of testing algorithms, UEFI boot support, and basic screen-level reporting. However, the Free tier restricts testing to a maximum of four consecutive passes. While four passes are generally sufficient for identifying severe hardware faults, extreme overclockers often prefer to run endless loops to verify stability under sustained heat.
The Pro edition requires a paid perpetual license and unlocks advanced diagnostic capabilities geared toward IT professionals and repair shops. Paid users gain access to ECC error injection, the ability to completely bypass the four-pass limit, and the option to generate customized HTML reports for client documentation. The Pro tier also enables an experimental direct memory access test, which forces the disk controller to read and write to RAM directly, bypassing the central processor entirely to uncover edge-case faults that standard tests miss.
For enterprise and high-volume manufacturing environments, a Site Edition is available. This top-tier package provides network boot capabilities, allowing IT departments to test hundreds of machines simultaneously across a local network without physically plugging a USB drive into each unit. It also enables full test automation via configuration files, ensuring every single machine on a production assembly line runs the exact same rigorous diagnostic sequence without requiring manual input from an operator.
PassMark MemTest86 vs. Memtest86+ vs. Windows Memory Diagnostic
Memtest86+ serves as an open-source alternative that originally branched off from the primary project decades ago. Users often choose Memtest86+ when they want a completely free tool with absolutely no pass limits or locked enterprise features. However, its development cycle has historically seen long pauses, meaning it sometimes lacks immediate support for the absolute newest memory controllers, specific enterprise chipsets, or complex hardware-level fault decoding features found in the commercial equivalent.
Windows Memory Diagnostic is a built-in operating system utility that requires no USB drives or third-party downloads to function. Users can run it directly from the start menu, and it automatically schedules a basic hardware check on the next system restart. While it is highly convenient for a quick preliminary check, its testing patterns are relatively simple, and it frequently fails to detect complex hardware faults or thermal-induced errors that only surface under extreme, sustained stress.
PassMark MemTest86 is the better fit for hardware professionals, overclockers, and users dealing with persistent, unexplained system crashes. Its consistent update schedule ensures immediate compatibility with the latest hardware standards, and its deep testing algorithms—such as row hammer checks and direct memory access tests—will find obscure memory degradation that simpler built-in utilities entirely miss.
Common Issues and Fixes
- Computer boots straight to the operating system instead of the tool. This occurs when the motherboard boot priority automatically overrides removable media. Restart the computer, enter the hardware settings, and move the USB flash drive to the top of the boot priority list, or use the temporary boot menu key during the startup sequence.
- Black screen or freezing immediately after selecting the USB drive. Older hardware may struggle with the application's multiprocessor testing mode. If the interface freezes before a test begins, restart the sequence and configure the tool to run in single-CPU mode using the advanced startup options menu.
- The writing utility fails to format the flash drive. Third-party antivirus software or active disk monitoring tools sometimes lock removable drives to prevent unauthorized changes. Temporarily disable active disk scanning, ensure no file explorer windows are open to the drive, and run the utility as an administrator.
- Motherboard rejects the boot drive due to a security violation. While the current software is officially signed, unusually strict corporate firmware settings can still block third-party bootloaders. Navigate to the hardware security settings and temporarily set Secure Boot to allow third-party certificates, or disable Secure Boot entirely until the diagnostic is complete.
- Flash drive shows incorrect capacity after the test is finished. The writing utility creates specific hidden partitions that standard operating systems do not natively recognize, making a large drive look like it only has a few megabytes of space. To fix this, launch the included writing utility again, select the drive, and use the Zero USB Drive function to restore its original factory formatting.
Version 11.5 — September 2025
- Added a new
CHECKSPDSMBIOSconfiguration parameter to verify consistency between SPD and SMBIOS data, automatically aborting tests if mismatches (such as conflicting serial numbers) are detected. - Updated EFI binary compilation to meet stricter Microsoft SecureBoot memory alignment requirements, ensuring compatibility with Rust-based UEFI firmware.
- Fixed a bug that caused incorrect CAS timing validation when the
CHECKMEMSPEEDparameter was enabled. - Resolved a system hang issue that occurred when querying memory controller settings on certain AMD Ryzen Zen platforms.
- Corrected an error where chip width was reported inaccurately for SMBIOS memory devices that do not specify this information.
- Updated the internal JEDEC manufacturer ID database to reflect the latest JEP106BM standards.