Capturing exactly what is on your monitor should not require opening a heavy image editor or saving a full-screen desktop image just to crop out a small section later. LightShot completely replaces the default Windows clipboard behavior with a fast, targeted desktop overlay that activates the moment you press a hotkey. Instead of taking a picture of your entire display, the application instantly darkens your screen and presents a precise crosshair cursor. You simply click and drag to select the exact boundary of the visual information you want to capture, ignoring the rest of your desktop background, taskbar, or unrelated browser tabs. This focused workflow eliminates the secondary step of editing entirely.
This approach removes friction from daily computer tasks by bridging the gap between taking a picture and actually using it. Customer support agents use the overlay to highlight specific interface buttons for clients, developers use it to grab visual error codes, and casual users rely on it to capture visual references. The utility stays quietly in the Windows system tray, consuming minimal system resources until you need it. Once your selection box is drawn, a floating toolbar appears directly on your screen, allowing you to draw arrows, highlight text, or add typed notes without opening a separate configuration window.
For users who frequently share visual information online, the application provides an immediate upload function that generates a short public URL on the spot. This is much faster than saving a local file, navigating to an image hosting website, manually uploading the file, and then copying the resulting link. The desktop application handles the entire transaction in the background, copying the live link directly to your clipboard in seconds. You can then paste that link straight into a chat application, forum post, or email draft, bypassing local file management entirely and keeping your hard drive free of temporary screenshot clutter.
Key Features
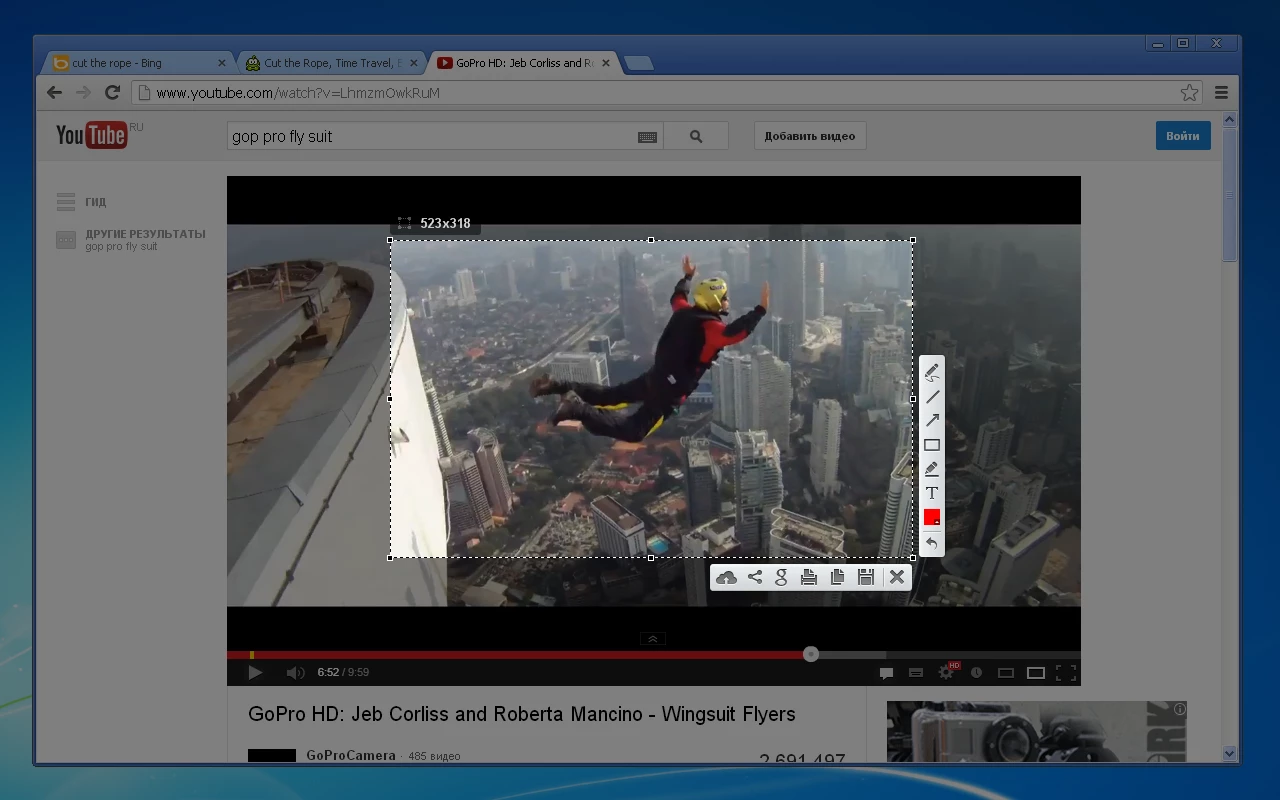
- Targeted Area Selection: The primary function activates immediately upon pressing the capture key, turning your cursor into a precise selection tool. You drag a box over the specific area you want to save, and a small tooltip displays the exact pixel dimensions of your selection. You can resize the borders of this box by dragging the edge handles before finalizing the capture, preventing the need to edit or crop the image after the fact.
- Instant Cloud Upload: Clicking the cloud icon or pressing Ctrl+D uploads your selected area directly to the public prntscr.com server. The application immediately copies a short link to your clipboard, allowing you to paste the URL into a chat application, email, or support ticket without managing local files or logging into an external web host.
- Floating Annotation Toolbar: Once you define your capture area, two small toolbars appear along the outside edges of your selection box. These toolbars provide quick access to basic drawing tools, including a pen, straight line, arrow, and rectangle, allowing you to highlight specific text blocks or point out interface elements before saving the image.
- Quick Color Selection: A dedicated color picker sits at the bottom of the annotation toolbar, letting you change the ink color for your drawn arrows, boxes, and text. This is highly practical for drawing bright red boxes around software errors or green arrows pointing to the correct navigation buttons, making visual communication clear and direct.
- Direct Local Saving: If you prefer not to upload the image to the internet, you can press Ctrl+S or click the floppy disk icon to save the file locally. A standard Windows save dialog appears, letting you name the file and choose between standard image formats like PNG, JPEG, and BMP for your local storage drive.
- Reverse Image Search Integration: The interface toolbar includes a button featuring a Google logo icon that takes your current screen selection and instantly runs a reverse image search on the web. This is practical for identifying unknown items in a photograph, finding the original source of an image, or looking up visually similar products without saving the file first.
- Clipboard Integration: You can bypass saving entirely by pressing Ctrl+C or clicking the copy icon on the overlay. This sends the cropped, annotated image directly to your Windows clipboard so you can paste it directly into Microsoft Word, Discord, Slack, or an email draft without creating a permanent file on your hard drive.
How to Install LightShot on Windows
- Download the official Windows installer executable from the application page.
- Double-click the downloaded setup file to launch the installation wizard.
- When the Windows User Account Control prompt appears on your screen, click Yes to allow the installer to make changes to your device.
- Select your preferred interface language from the initial setup dropdown menu and click OK to proceed.
- Read and accept the End User License Agreement to continue to the next step of the wizard.
- Review the default installation path, which is typically located in your Program Files directory, and click Next to begin copying the necessary files to your drive.
- Once the installation finishes, ensure the option to launch the application automatically is checked, and click Finish to close the setup wizard.
- Check your Windows system tray for the purple feather icon, indicating the background utility is running and actively ready to intercept your Print Screen key.
LightShot Free vs. Paid
The application is entirely free to download and use for all users. There are no premium tiers, no professional versions, and no enterprise licensing requirements to unlock functionality. You can install the capture tool on as many machines as you want, whether for personal home use, academic projects, or on commercial office computers.
Because there is no paid version, you do not have to worry about trial restrictions or locked features. The free version does not place intrusive watermarks on your local captures, nor does it limit the number of screenshots you can take or upload in a single day. All of the core features, including the annotation tools, cloud uploading, and reverse image search functions, are fully available to every user from the moment of installation.
The developer supports the ongoing maintenance and hosting of the software through advertising on their public image hosting website. When you upload a screenshot to generate a shareable link, the web page displaying that specific image will contain banner advertisements. However, the desktop application itself contains no adware, tracking software, or interface advertisements. You get a completely clean, distraction-free capture experience locally, and the server hosting costs are covered strictly by the ad inventory on the public URL viewing pages.
LightShot vs. ShareX vs. Greenshot
ShareX is a free, open-source capture utility built specifically for power users and highly technical workflows. It offers deeply advanced functions, including screen video recording, scrolling window capture, optical character recognition, and the ability to upload directly to dozens of custom remote destinations like Imgur, Amazon S3, or a personal FTP server. However, ShareX features a highly technical interface that requires a significant learning curve, and its sheer number of menus and automatic tasks can easily overwhelm users who just want to quickly grab an image and send it in a chat window.
Greenshot is another open-source alternative that excels at local file management and sending desktop captures to specific Microsoft Office applications. Greenshot includes an excellent local image editor window that allows you to easily obfuscate text, crop heavily, and manage drop shadows before exporting. It is built heavily around a traditional desktop workflow where files are saved permanently to a hard drive or sent directly to an attached printer. Greenshot is less focused on instant web link generation and relies on third-party plugins to connect to external image hosts, which can occasionally break or require manual configuration.
You should choose LightShot when speed, minimal configuration, and simplicity are your primary requirements. If you do not need to record video clips, set up custom FTP servers, or apply complex drop shadows in a separate editing window, LightShot removes the interface clutter entirely. Its core strength is turning a screen capture into a clickable, shareable web link or a directly pasted image in just a few seconds. It is the better fit for casual visual communication, quick bug reporting, and sending visual instructions without navigating a complex settings panel.
Common Issues and Fixes
- Print Screen key does not trigger the app on Windows 11. Windows 11 assigns the Print Screen key to its native Snipping Tool by default, preventing third-party tools from intercepting the keyboard command. To fix this, open Windows Settings, navigate to Accessibility, click on Keyboard, and toggle off the setting labeled "Use the Print screen key to open screen capture".
- Screenshots fail to capture apps running as Administrator. If you try to capture an elevated program like Task Manager or a game running in admin mode, the capture overlay may not appear. To resolve this, close the application from the system tray, search for it in the Start menu, right-click the icon, and select "Run as administrator".
- OneDrive intercepts the capture command. Microsoft OneDrive includes a backup feature that automatically saves screen captures to the cloud, overriding third-party desktop hotkeys. Open your OneDrive settings window, navigate to the Sync and backup tab, and turn off the toggle specifically labeled "Save screenshots I capture to OneDrive".
- Hotkey conflict error appears on launch. Another background app, such as a graphics driver utility or a streaming game overlay, might have the specific keyboard shortcut locked. You can either close the conflicting background app or right-click the system tray icon, open Options, go to the Hotkeys tab, and assign a new, unique key combination like Ctrl+Shift+1.
- The application darkens the wrong monitor in multi-display setups. Occasionally, the overlay darkens the wrong screen or spans incorrectly across displays configured with drastically different resolution scaling settings. To correct this, ensure both monitors are set to the exact same display scaling percentage in the Windows Display Settings menu, then restart the application from the system tray.
Version 5.5.0.7 — January 2021
- Improved the stability and speed of screenshot uploads to the cloud server.
- Optimized application performance to reduce memory usage while running in the background.
- Fixed a minor issue where the system tray icon occasionally became unresponsive.