Recuva Professional is a dedicated data recovery tool designed to retrieve deleted files from internal hard drives, external USB flash drives, SD cards, and other rewritable media. Unlike cloud-based backup solutions that require preventative synchronization, this desktop application acts as an emergency response utility for local file systems. It directly scans disk sectors to locate documents, photos, or video files that have been emptied from the Recycle Bin or lost due to accidental formatting. By processing operations entirely on local hardware, it bypasses internet bandwidth limits and prevents sensitive deleted files from being uploaded to external servers during the recovery phase.
For most administrative and IT recovery tasks, relying on a lightweight desktop executable is necessary because browsers cannot perform low-level disk sector reads. Recuva Professional targets users who need to restore recently deleted data before those specific drive clusters are overwritten by new operations. While many basic undelete utilities rely solely on reading the Master File Table, this application distinguishes itself with its ability to mount and recover data specifically from virtual hard drives, a feature often reserved for much more expensive forensic software.
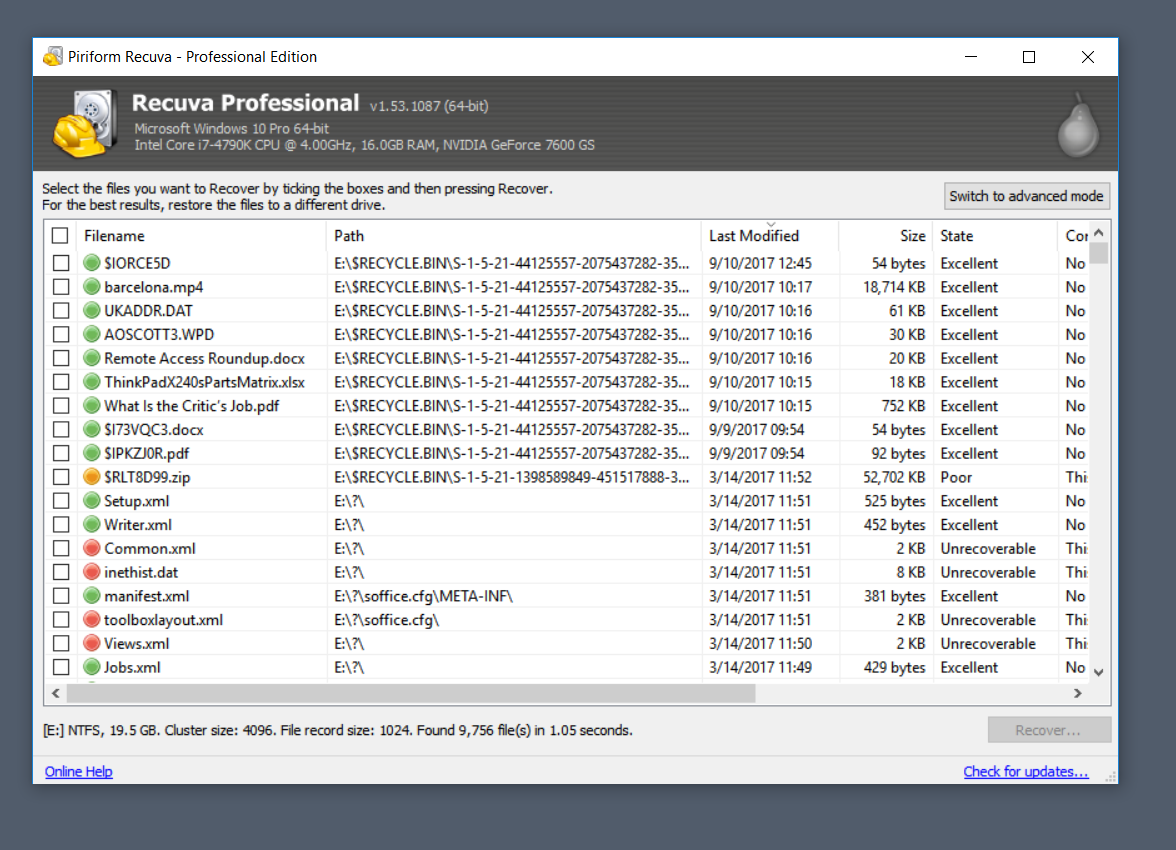
This specific focus on local file extraction makes it highly practical for recovering accidentally wiped camera memory cards, handling minor file system corruption, or rescuing drafts lost during software crashes. It provides a wizard-driven interface for casual users who just want to point the tool at a specific folder, alongside an Advanced Mode that grants IT technicians manual control over deep scanning parameters, secure file erasure passes, and file type filtering. When a critical spreadsheet is permanently deleted, launching this utility from a secondary drive allows the user to perform an immediate sector analysis without installing heavy storage management suites that might overwrite the missing data.
Key Features
- Virtual Hard Drive Support: The professional tier allows users to mount and scan VHD and IMG virtual disk images directly from the interface. Instead of requiring a separate virtualization host to boot the drive, you can extract deleted files from the image file exactly as if it were a physical disk connected to the motherboard.
- Deep Scan Mode: When the standard Master File Table scan fails to locate missing files, switching to Deep Scan forces the engine to read every sector of the storage drive. It searches for specific file headers and footers to reconstruct files by their raw binary signatures, which is necessary for formatted or mildly corrupted partitions.
- Secure File Overwrite: To ensure sensitive data cannot be recovered by competing tools, the application includes a secure deletion module. By right-clicking a detected file in the results list, users can apply DoD 5220.22-M multi-pass overwriting techniques to permanently destroy the underlying disk clusters.
- Advanced Mode Filtering: By cancelling the initial welcome wizard, operators can access the Advanced Mode interface to apply granular search parameters. This view allows filtering by exact file extensions, specifying custom file path directories, and toggling a hidden system file display to narrow down results among millions of disk entries.
- Color-Coded Health Indicators: Upon completing a disk analysis, the software generates a detailed list of found items accompanied by green, yellow, or red status icons. These indicators represent the structural integrity of the file, showing whether the specific sectors housing the document have been overwritten by new data since the original deletion.
- Folder Structure Restoration: Provided the partition's metadata remains relatively intact, the recovery engine attempts to rebuild the original directory paths rather than dumping all files into a single root folder. This function is particularly helpful when rescuing hundreds of nested project files or deep photo archives from a failing secondary drive.
How to Install Recuva Professional on Windows
- Download the official Windows installer package from the vendor's primary download portal and save it to a secondary drive if possible.
- Locate the downloaded executable file in your local directory and double-click it to initiate the setup wizard.
- Click "Yes" when prompted by the Windows User Account Control panel to grant the installer the administrative privileges required for low-level disk access.
- Review the installation options on the welcome screen; you can choose the default setup or select the customization menu to adjust shortcut creation and context menu integration.
- Select your preferred installation directory, ensuring you strictly install the application on a different partition than the one you intend to recover data from to prevent accidental sector overwriting.
- Uncheck any bundled promotional software offers if they appear in the installation sequence, then click the install button to write the program files to your local drive.
- Click the finish button to exit the setup utility and launch the application for the first time on your desktop.
- Upon the first launch, enter your registered name and license key in the options menu to unlock the professional features, automatic updates, and virtual drive support.
Recuva Professional Free vs. Paid
The software operates on a freemium model, offering an unusually generous base tier for a data recovery tool. The standard free tier provides unlimited file scanning and data recovery without imposing any artificial data caps, watermarks, or file size restrictions. Users can recover a single text document or an entire terabyte of deleted photos at zero cost, utilizing the exact same core recovery engine and Deep Scan capabilities found in the premium edition.
Upgrading to Recuva Professional requires an annual subscription, typically priced at $24.95 for a single computer. This paid tier is specifically targeted at advanced users and IT environments, as its primary technical addition is the ability to create, mount, and scan virtual hard drive images. Recovering data directly from a cloned disk image is a standard forensic practice that prevents further physical wear on a failing hard drive, making this specific feature highly valuable for technical troubleshooting.
Beyond virtual drive support, the Professional license removes the need for manual updates by introducing an automatic background updater and provides access to priority customer support directly from the development team. Because the core recovery algorithms remain identical across both editions, users dealing with standard logical data loss on basic physical drives often find the free tier sufficient. The paid tier is generally chosen by those who require the virtual disk functionality, need commercial licensing compliance, or prefer the convenience of automated maintenance and direct technical assistance within a corporate IT environment.
Recuva Professional vs. Disk Drill vs. EaseUS Data Recovery Wizard
Disk Drill operates at a significantly higher price point, typically charging $89 for a lifetime professional license, but it provides a broader scope of file system compatibility. While Recuva strictly focuses on Windows-compatible formats like NTFS, FAT32, and exFAT, Disk Drill includes out-of-the-box support for alternative partition types including APFS, HFS+, and EXT4. Disk Drill also features built-in byte-to-byte disk imaging and disk health monitoring, making it the more appropriate choice for cross-platform environments or drives exhibiting early signs of physical hardware failure.
EaseUS Data Recovery Wizard is positioned as a heavy-duty solution for complex logical corruption, charging roughly $69.95 per month for its professional tier. It consistently outperforms basic undelete tools when handling RAW partitions, severely corrupted drives, or scenarios where the master file table has been entirely destroyed. EaseUS also includes a dedicated file repair module that attempts to stitch back together damaged MP4 or JPEG files after extraction, making it highly effective for severe multimedia data loss where file headers are partially fragmented.
Recuva Professional remains the better fit for users who need a straightforward, lightweight utility to address immediate, accidental file deletions on standard Microsoft file systems. Its annual subscription is a fraction of the cost of its premium competitors, and its free tier completely lacks the strict data recovery limits imposed by EaseUS and Disk Drill. When dealing with a recently emptied Recycle Bin, an accidentally formatted USB stick, or a mounted virtual hard drive, Recuva performs the task quickly without consuming excessive system resources or requiring expensive lifetime licenses.
Common Issues and Fixes
- Problem description. The Deep Scan progress bar gets stuck at one percent and hangs indefinitely due to physical bad sectors on the storage drive. To resolve this, open the Task Manager to force quit the application and stop the read operation. Then, run a disk check command via an elevated Command Prompt to map and bypass the bad sectors before attempting the scan again.
- Problem description. Recovered files are successfully extracted but are renamed with random numbers instead of their original file names. This happens when the Master File Table is completely overwritten, stripping the files of their original metadata. The only fix is to manually open the successfully recovered files and rename them based on their contents, as the original folder paths no longer exist on the disk.
- Problem description. Extracted images and documents are marked with a green health circle but display an error and cannot be opened in standard viewer applications. This indicates the disk sectors were likely partially overwritten by new data immediately after the deletion occurred. You can attempt to open the corrupted files using third-party repair tools or format converters like IrfanView, which can sometimes bypass broken file headers and salvage the remaining visual data.
- Problem description. The target storage drive does not appear in the application's selection menu because it has a RAW file system or lacks an assigned drive letter. Open the built-in Disk Management utility and right-click the problematic partition to assign a new drive letter. Afterward, restart the recovery software to force the operating system and the application to mount the disk properly.
Version 1.54.120 — June 2024
- Enhanced the integration with licensing platforms to ensure a more seamless activation process for Professional users.
- Optimized the license delivery system to provide a faster and more reliable experience when upgrading or validating software.
- Implemented minor stability improvements and general bug fixes to maintain optimal system performance.